

Difference between revisions of "KMotionCNC Screen Editor"
From Dynomotion
(Created page with "'''Table of contents:''' # Introduction # Control styles # Control attributes # Main Window attributes # Bitmap types and Alpha and locations =====Introduction===== Video:...") |
m (Create Heading for Script Options) |
||
| (19 intermediate revisions by the same user not shown) | |||
| Line 1: | Line 1: | ||
| − | ''' | + | ''' ''' |
| − | + | =====Introduction===== | |
| − | + | ||
| − | + | ||
| − | + | ||
| − | + | ||
| + | Video: [https://www.youtube.com/watch?v=uQWDttzKuDA https://www.youtube.com/watch?v=uQWDttzKuDA] | ||
| − | + | {{#ev:youtube|uQWDttzKuDA}} | |
| − | + | ||
'''Features include:''' | '''Features include:''' | ||
| Line 60: | Line 56: | ||
Some more advanced features include input fields, C program actions, label DROs. Load the addition example in the screen editor. Example contains two user input controls and one DRO label control. The input edit controls are associated with KFLOP persist variables 160 and 161. The DRO label is associated with KFLOP persist variable 162. The Add button is configured for screen script action to run a C program in KFLOP. The C program is contained in the file “Add.c”. Test it by entering two values and pushing the Add button. Now open KMotion and look at the simple C code that is behind the function. (Open the file “Add.c”). | Some more advanced features include input fields, C program actions, label DROs. Load the addition example in the screen editor. Example contains two user input controls and one DRO label control. The input edit controls are associated with KFLOP persist variables 160 and 161. The DRO label is associated with KFLOP persist variable 162. The Add button is configured for screen script action to run a C program in KFLOP. The C program is contained in the file “Add.c”. Test it by entering two values and pushing the Add button. Now open KMotion and look at the simple C code that is behind the function. (Open the file “Add.c”). | ||
| − | + | =====Momentary and Toggle button types in KMotion CNC Screen Editor===== | |
| − | + | ||
| − | + | ||
[https://www.youtube.com/watch?v=eE2mSUXxN2M https://www.youtube.com/watch?v=eE2mSUXxN2M] | [https://www.youtube.com/watch?v=eE2mSUXxN2M https://www.youtube.com/watch?v=eE2mSUXxN2M] | ||
| + | |||
| + | {{#ev:youtube|eE2mSUXxN2M}} | ||
Start KMotion CNC Screen Editor, and click on the “Main” tab, then on “Read Script” and choose the file named MomentaryToggle.scr | Start KMotion CNC Screen Editor, and click on the “Main” tab, then on “Read Script” and choose the file named MomentaryToggle.scr | ||
| Line 71: | Line 67: | ||
[[File:Momentary-button-2.png|none|link=]] | [[File:Momentary-button-2.png|none|link=]] | ||
| − | Clicking the Momentary button activates the bit; releasing it,deactivates it. Clicking the Toggle button once sets the bit; clicking it again releases it. | + | Clicking the Momentary button activates the bit; releasing it, deactivates it. Clicking the Toggle button once sets the bit; clicking it again releases it. |
| + | |||
| + | |||
| + | |||
| + | =====Combo Box Control with Drop Down Lists in KMotion CNC Screen Editor===== | ||
| + | [https://www.youtube.com/watch?v=Pp5DPfn8GLI https://www.youtube.com/watch?v=Pp5DPfn8GLI] | ||
| + | |||
| + | {{#ev:youtube|Pp5DPfn8GLI}} | ||
| + | |||
| + | Combo Box Controls allow the Operator to select text items from a list. The list items are specified as semicolon separated strings in the Text Property for the Control. Combo Boxes are read in the same Manner as Edit Controls where the Var Parameter of the Control is used to request the contents of the Control. When KMotionCNC detects a non-zero value of the persist variable it uses the value as an offset into the Gather Buffer and places the selected text into the Gather Buffer. | ||
| + | |||
| + | KFLOP also maintains an EditChangeCount value which is incremented each time any Edit or ComboBox Control changes. See the ComboBoxCopyToDROLabelwhenChangedUnicode.c Example. | ||
| + | |||
| + | ComboBox Selections made by the Operator are maintained from one KMotionCNC Session to the next using a Disk file: | ||
| + | \KMotion\Data\EditControlPersist.txt | ||
| + | =====Dual Button Types in KMotion CNC Screen Editor===== | ||
| + | [https://www.youtube.com/watch?v=8dAEeGnLaRg https://www.youtube.com/watch?v=8dAEeGnLaRg] | ||
| + | {{#ev:youtube|8dAEeGnLaRg}} | ||
| − | + | Certain buttons connected to internal status modes display one of 2 bitmaps depending on the state. Such as the Cycle Start Button displays either a Play image or a Halt image dependent on whether a Job is running. The 2 bitmaps can be reassigned to override the default images. | |
| + | =====Instantaneous Feed Rate Display===== | ||
[https://youtu.be/w-bKvqXCd0Q https://youtu.be/w-bKvqXCd0Q] | [https://youtu.be/w-bKvqXCd0Q https://youtu.be/w-bKvqXCd0Q] | ||
| − | + | {{#ev:youtube|[https://youtu.be/w-bKvqXCd0Q w-bKvqXCd0Q]}} | |
| + | Normally the feed rate indication in KMotionCNC shows ''average'' feed rate over 100ms, assuming straight line motion. Here we use a C program to calculate a more instantaneous rate and display it on the KMotionCNC screen using the KMotionCNC screen editor. Here the C program samples two positions and times, computes the delta position and the delta time, formats it to a string and displays it onto DRO label 162 in KMotionCNC and it performs this action roughly every one ½ seconds. Here is the screen script for the screen shown on the left, we’ve added a type DRO label in the screen editor, edited colors and it is connected to persist variable 162. This job consist of a rapid helix bore at a rate of about 6 revolutions per second. It shows the instant feed rate being more correct. | ||
| − | + | There is a newer example which also displays the feed rate as a vertical bar graph. See: | |
| + | ShowInstantFeedRate3AxisBar.scr and related C Program ShowInstantVelocityDROBar.c | ||
| + | |||
| + | =====Split/Full/Hidden GViewer Display on Main Dialog Face===== | ||
[https://youtu.be/VkBhYpyGpNU https://youtu.be/VkBhYpyGpNU] | [https://youtu.be/VkBhYpyGpNU https://youtu.be/VkBhYpyGpNU] | ||
| − | + | {{#ev:youtube|VkBhYpyGpNU}} | |
| + | =====Using Resizeable/Floating GViewer Control with Custom Screen===== | ||
| + | Normally with a Custom Screen the GViewer Plotting is sent to the GViewer Control on the Main Dialog Face and the floating/re-sizable GViewer window is not used. It is normally closed and the GViwer Button to open it is hidden. However if it is desired to use the floating/re-sizable GViewer window rather than the Control on the Main Screen (which is hidden), this can be accomplished by setting the Var parameter for the Main Screen GViewer Control (IDC_viewctrl) to 0. Non-zero values will direct the Plotting to the GViewer Control on the Main Dialog Face. | ||
| − | |||
| + | =====Main Screen Style===== | ||
| + | KMotionCNC Screen Editor supports changing main screen style. See the Main Dialog Screen Option under the Main Tab. Boolean Screen Script Options: "Caption:" "MaxBox:" "MinBox:" "ResizeFrame:" "Maximize:" | ||
| + | |||
| + | =====Maximized Captionless KMotionCNC Screens===== | ||
[https://youtu.be/R44F0_upIoA https://youtu.be/R44F0_upIoA] | [https://youtu.be/R44F0_upIoA https://youtu.be/R44F0_upIoA] | ||
| + | |||
| + | {{#ev:youtube|R44F0_upIoA}} | ||
New option in KMotionCNC Screen Editor V4.34e allows screens to be maximized to full screen and with or without Window Frame/Title. New options in Screen Editor: turn minimum box on or off, maximum box on or off, resizing frame on or off. Caption on top can be present or absent. | New option in KMotionCNC Screen Editor V4.34e allows screens to be maximized to full screen and with or without Window Frame/Title. New options in Screen Editor: turn minimum box on or off, maximum box on or off, resizing frame on or off. Caption on top can be present or absent. | ||
| Line 129: | Line 154: | ||
* '''X, Y<br /> '''Changes the horizontal and vertical position of the control. | * '''X, Y<br /> '''Changes the horizontal and vertical position of the control. | ||
* '''Width, Height'''<br /> Changes the size of the control. | * '''Width, Height'''<br /> Changes the size of the control. | ||
| − | * '''Script'''<br /> Using this field, the user has three options | + | * '''Script'''<br /> Using this field, the user has three options shown below.<br /><br /> |
| + | Video demonstration of the creation of Screen Script to perform Windows Messages | ||
| + | |||
| + | {{#ev:youtube|9x4JTswwWvk}} | ||
| + | |||
| + | |||
| + | |||
| + | =====Control Script Options===== | ||
a) Selecting a screen script file from the library: | a) Selecting a screen script file from the library: | ||
| Line 152: | Line 184: | ||
=====Bitmap types, Alpha, and locations===== | =====Bitmap types, Alpha, and locations===== | ||
<br />The following bitmap types are supported: .bmp, .gif, and.png. Out of these, only the png file type supports alpha channels, i.e. background transparency.<br />Images are stored in the following “Resources” location:<br />\KMotion434i\PC VC Examples\KMotionCNC\res | <br />The following bitmap types are supported: .bmp, .gif, and.png. Out of these, only the png file type supports alpha channels, i.e. background transparency.<br />Images are stored in the following “Resources” location:<br />\KMotion434i\PC VC Examples\KMotionCNC\res | ||
| + | |||
| + | =====Motion Buttons (for Jogging)===== | ||
| + | Special Buttons for Jogging exist with Style MotionButton. Although these buttons can be customized with regard to Bitmap images, size, positions, Font, ToolTips, Show/Hide, and Hotkeys they have fixed functionality for the 6 GCode Axes XYZABC. They support momentary Hotkey and combined mouse operation with the ability to have multiple Hotkeys pushed simultaneously and dynamically change speed using the SHIFT key. Additional MotionButtons can not be currently added. | ||
| + | |||
| + | |||
| + | |||
| + | [[File:MotionButtons.png|none|link=]] | ||
| + | |||
| + | |||
| + | The Jog Buttons are grouped into 6 buttons per axis. 3 of the 6 buttons are used for moving one direction and 3 for the other direction. The 3 buttons correspond to Stepping a fixed distance, Jogging slow, and Jogging Fast. The Resource IDs corresponding to each axis are: | ||
| + | |||
| + | |||
| + | '''X + = IDC_RightStep, IDC_Right, IDC_Right2''' | ||
| + | |||
| + | '''X - = IDC_LeftStep, IDC_Left, IDC_Left2''' | ||
| + | |||
| + | ''' ''' | ||
| + | |||
| + | '''Y + = IDC_UpStep, IDC_Up, IDC_Up2''' | ||
| + | |||
| + | '''Y - = IDC_DownStep, IDC_Down, IDC_Down2''' | ||
| + | |||
| + | ''' ''' | ||
| + | |||
| + | '''Z + = IDC_ZplusStep, IDC_Zplus, IDC_Zplus2''' | ||
| + | |||
| + | '''Z - = IDC_ZminusStep, IDC_Zminus, IDC_Zminus2''' | ||
| + | |||
| + | ''' ''' | ||
| + | |||
| + | '''A + = IDC_AplusStep, IDC_Aplus, IDC_Aplus2''' | ||
| + | |||
| + | '''A - = IDC_AminusStep, IDC_Aminus, IDC_Aminus2''' | ||
| + | |||
| + | |||
| + | '''B + = IDC_BplusStep, IDC_Bplus, IDC_Bplus2''' | ||
| + | |||
| + | '''B - = IDC_BminusStep, IDC_Bminus, IDC_Bminus2''' | ||
| + | |||
| + | |||
| + | '''C + = IDC_CplusStep, IDC_Cplus, IDC_Cplus2''' | ||
| + | |||
| + | '''C - = IDC_CminusStep, IDC_Cminus, IDC_Cminus2''' | ||
| + | |||
| + | |||
| + | '''Note the HotKeys for all 3 Motion Buttons for each axis/direction must be set to the same value.''' This is because the same HotKey combined with CTRL and SHIFT alter the behavior to Step and Fast respectively. If not all 3 buttons are desired for the screen the others may be hidden but should be all defined to the same HotKey for the HotKey functionality to work correctly. Furthermore no other buttons should be defined with the same HotKeys. The Screen Editor has a special feature to test for Duplicate HotKey assignments called "check dup hotkey" | ||
| + | |||
| + | |||
| + | There is also one associated IDC_StopStep button which will stop any Step Movement currently in progress. | ||
| + | |||
| + | =====Performing an action Immediately within Screen Script===== | ||
| + | Normally when processing a Screen Script, the "Script" Parameter defines for a Push Button Control what should happen when the Push Button is pushed. However when a "Script" Parameter is specified for a static Label the Action will occur immediately after the Screen Script is processed. | ||
| + | |||
| + | For example: when loading a screen intended for Simulation we might want to have the Simulation mode automatically selected on. So the Script for the IDC_SimulateStatic Label might be set to check the simulate checkbox with: | ||
| + | |||
| + | WinMsg:DlgName;IDC_Simulate;BM_SETCHECK;BST_CHECKED | ||
| + | |||
| + | =====Scaling an Entire Screen or Portion of a Screen===== | ||
| + | A new Screen Editor feature has been added to stretch/shrink a number of selected screen controls by a specified percentage. The height and width of the controls can be stretched as with their XY positions. The horizontal and vertical directions can be Stretched/Shrunk independently. Scaling the Vertical direction will also scale any Font point settings. The Width and Height of the entire dialog will also be scaled accordingly. | ||
| + | |||
| + | |||
| + | To Scale a Screen: | ||
| + | |||
| + | # Select the controls to be scaled - usually all controls (drag a box to select multiple controls) | ||
| + | # Select mode: Screen Scale | ||
| + | # Select the desired Size Change as a percentage 1-100% (ie 60% corresponds to a stretch/shrink factor of 1.6) | ||
| + | # Push Increase/Decrease Width button | ||
| + | # Push Increase/Decrease Height button | ||
| + | |||
| + | |||
| + | Note: it is best to scale in one step vs multiple steps as control widths and font sizes are integers and may have rounding after each step. | ||
| + | |||
| + | Note: any bitmap images will be unchanged and remain the same size. They can be manually scaled with a graphics app if necessary. | ||
| + | |||
| + | |||
| + | Screen Editor with Screen Scale of 60% and all controls selected: | ||
| + | |||
| + | [[File:ScreenScale.png|none|link=|710x627px]] | ||
| + | |||
| + | |||
| + | Example Original Screen: | ||
| + | |||
| + | [[File:ScreenScale100.png|none|link=|639x471px]] | ||
| + | |||
| + | |||
| + | Example Scaled up 60% | ||
| + | |||
| + | [[File:ScreenScale160.png|none|link=|879x641px]] | ||
| + | |||
| + | |||
| + | |||
| + | =====Hierarchical Sub Script Files===== | ||
| + | When creating multiple Screens with sections of Controls that are duplicated among screens, possibly re-positioned on the Screen, it is useful to make use of SubScript files. Selecting one or more Controls and setting a SubScript file name for them will move them to a separate file which will then be referenced from the main file. SubScript files can also reference SubScript files in a hierarchical manner. | ||
| + | |||
| + | See this Video Demonstration | ||
| + | |||
| + | {{#ev:youtube|bWToNV6922s}} | ||
Latest revision as of 14:38, 7 July 2025
Contents
- 1 Introduction
- 2 Momentary and Toggle button types in KMotion CNC Screen Editor
- 3 Combo Box Control with Drop Down Lists in KMotion CNC Screen Editor
- 4 Dual Button Types in KMotion CNC Screen Editor
- 5 Instantaneous Feed Rate Display
- 6 Split/Full/Hidden GViewer Display on Main Dialog Face
- 7 Using Resizeable/Floating GViewer Control with Custom Screen
- 8 Main Screen Style
- 9 Maximized Captionless KMotionCNC Screens
- 10 Control styles
- 11 Control attributes
- 12 Control Script Options
- 13 Main Window attributes
- 14 Bitmap types, Alpha, and locations
- 15 Motion Buttons (for Jogging)
- 16 Performing an action Immediately within Screen Script
- 17 Scaling an Entire Screen or Portion of a Screen
- 18 Hierarchical Sub Script Files
Introduction
Video: https://www.youtube.com/watch?v=uQWDttzKuDA
Features include:
- Show/Hide Controls
- Change Size and Position of Controls
- Change Label/Button Text
- International Character Support
- Change Font/Text Size
- Bitmap Buttons and Labels
- JPG, BMP, PNG Bitmaps
- Toggle Bitmap Labels (LEDs)
- Customizable Keyboard Hotkeys
- Customizable Button Tool Tips
- Programmable DRO (Digital Read Output) Labels
- Custom User Entry Controls
The 6-axes default screen is changed to a 5-axes screen by deleting the z-axis. We start by installing KMotion 4.34b or later. Note that if you don’t already have Dot Net version 4.62 or Visual Studio 2015 libraries installed, you will be prompted to load those. Create desktop icons for KMotion, KMotionCNC and KMotionCNC Screen Editor. Run KMotion and observe the default 3-axes resizable screen.

Close the G Viewer window and change the dialog face to Default Custom Screen with no screen script specified. (Tool Setup):
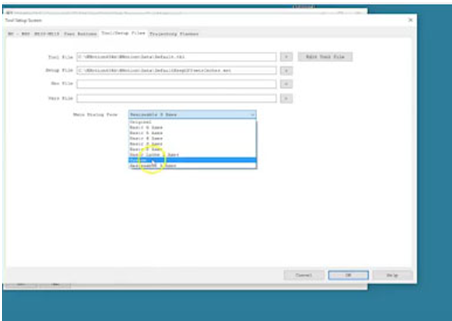
Now run the KMotionCNC Screen Editor. It automatically syncs to KMotionCNC’s controls and they are graphically displayed.
This graphical representation allows you to select which controls you want to modify.
Notice we can select a control and immediately hide or show it over at KMotionCNC. The controls can be moved or resized. There is also unlimited undo/redo. Multiple controls can be selected by dragging the mouse over the graphical display. Click SHIFT to add more controls, or CTRL to remove from the selection.
Examples:
- Select multiple controls for hiding and moving.
- Change main dialog screen dimensions.
- Change label text. Push SET key and KMotion CNC screen updates the text.
- Increase the size of the controls.
The screen editor features international text support. Note that only certain fonts are capable of displaying international text. In our example, we selected Arial.
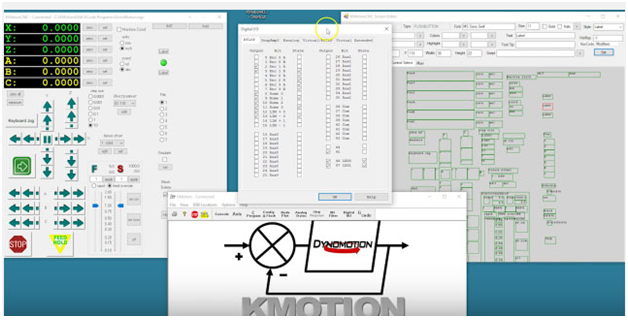
Labels can show or toggle bitmaps based on an IO bit. As an example, we first we select bitmap 1, then bitmap 2. Increase the size of the label, so the bitmap shows properly. Then assign an IO bit number that will control the bitmap displayed. Notice the bitmap turns green, because the bit is currently on. Open KMotion and look at the state of IO bit #46 and see that it is on. Toggling the bit affects the bitmap on the screen:
Users can configure push buttons for text, font, size, color, and tool tip. Select two sample labels and change them to type: button. Select both buttons and modify their fonts as well as their size. Four colors are available for text and background, each in normal and depressed button state. You can then change the name of each button individually, one to say “On” and the other“Off”. You can assign tool tips to each of the buttons, so when the operator hovers over the buttons, they will be prompted with a tool tip notification.
Buttons can be assigned to perform actions. Select a script that can either be a screen script or an action. We select an action type to set bit 46 to 1. Notice that this is the script that indicated that. For the other button, we select an action which sets bit 46 to 0. Now pushing the buttons will perform these actions. Save your new screen as a screen script file. Screen script is under the KMotionCNC directory and the sub-directory“Screens”. Configure KMotionCNC to use this new screen at every new startup.Notice that tool setup screen can be accessed by right-mouse clicking on the KMotionCNC title (in “Tools/Setup files”). Select the screen you just created.
Some more advanced features include input fields, C program actions, label DROs. Load the addition example in the screen editor. Example contains two user input controls and one DRO label control. The input edit controls are associated with KFLOP persist variables 160 and 161. The DRO label is associated with KFLOP persist variable 162. The Add button is configured for screen script action to run a C program in KFLOP. The C program is contained in the file “Add.c”. Test it by entering two values and pushing the Add button. Now open KMotion and look at the simple C code that is behind the function. (Open the file “Add.c”).
Momentary and Toggle button types in KMotion CNC Screen Editor
https://www.youtube.com/watch?v=eE2mSUXxN2M
Start KMotion CNC Screen Editor, and click on the “Main” tab, then on “Read Script” and choose the file named MomentaryToggle.scr
You will see two buttons, a Momentary button assigned to bit46 and a Toggle button assigned to bit 47. You will also see two labels to display the status of bits 46 and 47 as LED bitmaps. We also have KMotion displaying the status of bits 46 and 47.
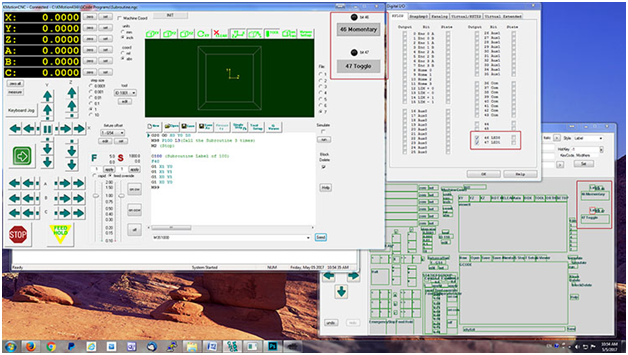
Clicking the Momentary button activates the bit; releasing it, deactivates it. Clicking the Toggle button once sets the bit; clicking it again releases it.
Combo Box Control with Drop Down Lists in KMotion CNC Screen Editor
https://www.youtube.com/watch?v=Pp5DPfn8GLI
Combo Box Controls allow the Operator to select text items from a list. The list items are specified as semicolon separated strings in the Text Property for the Control. Combo Boxes are read in the same Manner as Edit Controls where the Var Parameter of the Control is used to request the contents of the Control. When KMotionCNC detects a non-zero value of the persist variable it uses the value as an offset into the Gather Buffer and places the selected text into the Gather Buffer.
KFLOP also maintains an EditChangeCount value which is incremented each time any Edit or ComboBox Control changes. See the ComboBoxCopyToDROLabelwhenChangedUnicode.c Example.
ComboBox Selections made by the Operator are maintained from one KMotionCNC Session to the next using a Disk file: \KMotion\Data\EditControlPersist.txt
Dual Button Types in KMotion CNC Screen Editor
https://www.youtube.com/watch?v=8dAEeGnLaRg
Certain buttons connected to internal status modes display one of 2 bitmaps depending on the state. Such as the Cycle Start Button displays either a Play image or a Halt image dependent on whether a Job is running. The 2 bitmaps can be reassigned to override the default images.
Instantaneous Feed Rate Display
Normally the feed rate indication in KMotionCNC shows average feed rate over 100ms, assuming straight line motion. Here we use a C program to calculate a more instantaneous rate and display it on the KMotionCNC screen using the KMotionCNC screen editor. Here the C program samples two positions and times, computes the delta position and the delta time, formats it to a string and displays it onto DRO label 162 in KMotionCNC and it performs this action roughly every one ½ seconds. Here is the screen script for the screen shown on the left, we’ve added a type DRO label in the screen editor, edited colors and it is connected to persist variable 162. This job consist of a rapid helix bore at a rate of about 6 revolutions per second. It shows the instant feed rate being more correct.
There is a newer example which also displays the feed rate as a vertical bar graph. See:
ShowInstantFeedRate3AxisBar.scr and related C Program ShowInstantVelocityDROBar.c
Split/Full/Hidden GViewer Display on Main Dialog Face
Using Resizeable/Floating GViewer Control with Custom Screen
Normally with a Custom Screen the GViewer Plotting is sent to the GViewer Control on the Main Dialog Face and the floating/re-sizable GViewer window is not used. It is normally closed and the GViwer Button to open it is hidden. However if it is desired to use the floating/re-sizable GViewer window rather than the Control on the Main Screen (which is hidden), this can be accomplished by setting the Var parameter for the Main Screen GViewer Control (IDC_viewctrl) to 0. Non-zero values will direct the Plotting to the GViewer Control on the Main Dialog Face.
Main Screen Style
KMotionCNC Screen Editor supports changing main screen style. See the Main Dialog Screen Option under the Main Tab. Boolean Screen Script Options: "Caption:" "MaxBox:" "MinBox:" "ResizeFrame:" "Maximize:"
Maximized Captionless KMotionCNC Screens
New option in KMotionCNC Screen Editor V4.34e allows screens to be maximized to full screen and with or without Window Frame/Title. New options in Screen Editor: turn minimum box on or off, maximum box on or off, resizing frame on or off. Caption on top can be present or absent.
Available viewing options (three buttons on the top-right hand side of the screen: “Split”: Split screen mode, “View”: G Code Viewer or “Code”: G Code.
Control styles
Available style options:
- Label
Can be text or bitmap. The background is determined by the main dialog background. - Button
Buttons can have all 4 options (foreground and background colors in on- and off-state) or they can also be bitmaps. Labels can load actions/scripts when the main screen is loaded. - MotionButton
Motion buttons are strictly for jog button use only. - ToggleButton
See description above and video. - DROLabel
(Digital Read Out) runs a program in KFLOP, e.g. reads two edit cells in the “Add” example and passes back the result. X, Y, and Z are other examples of DRO labels. - VertBar
Plots a vertical graph from 0 to 100% and is read by KFLOP like DRO labels. See also the Instant Feed Rate Display video. - Radio button
- Momentary button
See description above and video:
https://www.youtube.com/watch?v=eE2mSUXxN2M - DualButton
See description above and video:
https://www.youtube.com/watch?v=8dAEeGnLaRg - Checkbox
- DualLabel
F for feed rate and S for spindle are example of dual labels. They display the state (one or another). They are fixed and cannot be edited.
Control attributes

- Select ID
Defines the name of the control on the screen. - Type
Defines the type of control, e.g.: CONTROL, PUSHBUTTON, COMBOBOX. - Font
Set the font type, size and normal, bold, or italic. - BitmapFile1, BitMapFile2
Select a bitmap image (.bmp, .gif or .png) for your buttons. BitMapFile1 will show the selected file when the button is in normal state, BitMapFile2 when the button pressed. - Colors
Select two colors for on- and off-state (text). - Highlight
Select two colors for on- and off-state (background). - Tool Tip
Compose text to describe the button action. This text will be visible when the user hovers over the button. - HotKey
Assigns a keyboard key to perform an action. This field is by default set to “-1”. For example, select a control like “mm” and type “CTRL M” or select “in” and type “CTRL I” and click “Set”. The “x” button next to the field will restore the value back to “-1”. - Var
Numeric variable attribute. Assigning a number toggles the corresponding bit in KFLOP (from 0 to 2047). - X, Y
Changes the horizontal and vertical position of the control. - Width, Height
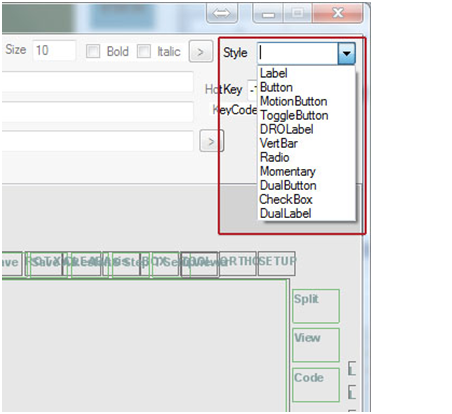
Changes the size of the control. - Script
Using this field, the user has three options shown below.
Video demonstration of the creation of Screen Script to perform Windows Messages
Control Script Options
a) Selecting a screen script file from the library:
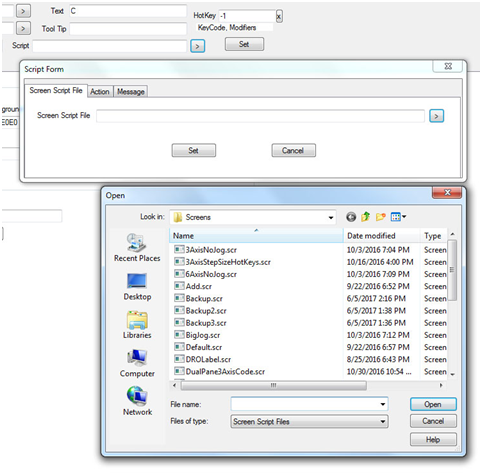


- Show/Hide
Select a control and immediately show or hide it.
- Move/Resize
Move the position of the control or change its size. - Undo/Redo
An unlimited number of undoes and redoes is available. - Copy/Paste
The user can edit all three screens (Split, View, and Code) by clicking “Copy” after making an edit such as moving a button, then loading the next screen, clicking outside the editable area and selecting “Paste”. - General
When selecting multiple controls, white fields are shown when all settings are the same, and grey fields when the values are different. In the example below note that we have selected the radio buttons labeled 1 through 7. While they all share the same font type, size, width and horizontal (x) position etc., “text” and “y-position” are grayed-out, since the radio buttons’ text labels and their vertical position are unique to each field. To override this, just click into the grayed-out field(s) and start editing.
Main Window attributes
- Main Dialog Screen
Defines the look and feel as well as the size of your KMotionCNC screen. You can choose a background color, or select a bitmap file as your background. Choose the size of the window, or whether the window should be resizable or fixed and so on.
- Script File
Select a screen script file from the library or set an action. A screen script file defines the look of a page. You can assign an action to a button to load a screen script file.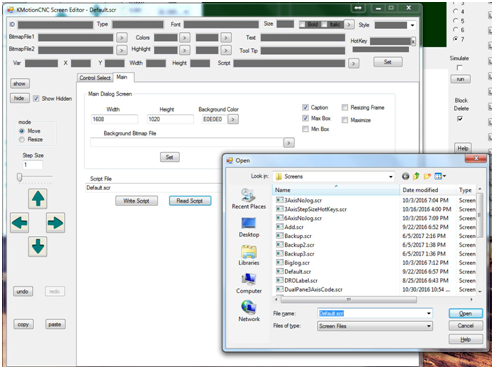
Bitmap types, Alpha, and locations
The following bitmap types are supported: .bmp, .gif, and.png. Out of these, only the png file type supports alpha channels, i.e. background transparency.
Images are stored in the following “Resources” location:
\KMotion434i\PC VC Examples\KMotionCNC\res
Motion Buttons (for Jogging)
Special Buttons for Jogging exist with Style MotionButton. Although these buttons can be customized with regard to Bitmap images, size, positions, Font, ToolTips, Show/Hide, and Hotkeys they have fixed functionality for the 6 GCode Axes XYZABC. They support momentary Hotkey and combined mouse operation with the ability to have multiple Hotkeys pushed simultaneously and dynamically change speed using the SHIFT key. Additional MotionButtons can not be currently added.
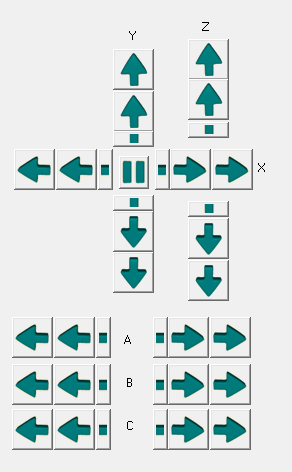
The Jog Buttons are grouped into 6 buttons per axis. 3 of the 6 buttons are used for moving one direction and 3 for the other direction. The 3 buttons correspond to Stepping a fixed distance, Jogging slow, and Jogging Fast. The Resource IDs corresponding to each axis are:
X + = IDC_RightStep, IDC_Right, IDC_Right2
X - = IDC_LeftStep, IDC_Left, IDC_Left2
Y + = IDC_UpStep, IDC_Up, IDC_Up2
Y - = IDC_DownStep, IDC_Down, IDC_Down2
Z + = IDC_ZplusStep, IDC_Zplus, IDC_Zplus2
Z - = IDC_ZminusStep, IDC_Zminus, IDC_Zminus2
A + = IDC_AplusStep, IDC_Aplus, IDC_Aplus2
A - = IDC_AminusStep, IDC_Aminus, IDC_Aminus2
B + = IDC_BplusStep, IDC_Bplus, IDC_Bplus2
B - = IDC_BminusStep, IDC_Bminus, IDC_Bminus2
C + = IDC_CplusStep, IDC_Cplus, IDC_Cplus2
C - = IDC_CminusStep, IDC_Cminus, IDC_Cminus2
Note the HotKeys for all 3 Motion Buttons for each axis/direction must be set to the same value. This is because the same HotKey combined with CTRL and SHIFT alter the behavior to Step and Fast respectively. If not all 3 buttons are desired for the screen the others may be hidden but should be all defined to the same HotKey for the HotKey functionality to work correctly. Furthermore no other buttons should be defined with the same HotKeys. The Screen Editor has a special feature to test for Duplicate HotKey assignments called "check dup hotkey"
There is also one associated IDC_StopStep button which will stop any Step Movement currently in progress.
Performing an action Immediately within Screen Script
Normally when processing a Screen Script, the "Script" Parameter defines for a Push Button Control what should happen when the Push Button is pushed. However when a "Script" Parameter is specified for a static Label the Action will occur immediately after the Screen Script is processed.
For example: when loading a screen intended for Simulation we might want to have the Simulation mode automatically selected on. So the Script for the IDC_SimulateStatic Label might be set to check the simulate checkbox with:
WinMsg:DlgName;IDC_Simulate;BM_SETCHECK;BST_CHECKED
Scaling an Entire Screen or Portion of a Screen
A new Screen Editor feature has been added to stretch/shrink a number of selected screen controls by a specified percentage. The height and width of the controls can be stretched as with their XY positions. The horizontal and vertical directions can be Stretched/Shrunk independently. Scaling the Vertical direction will also scale any Font point settings. The Width and Height of the entire dialog will also be scaled accordingly.
To Scale a Screen:
- Select the controls to be scaled - usually all controls (drag a box to select multiple controls)
- Select mode: Screen Scale
- Select the desired Size Change as a percentage 1-100% (ie 60% corresponds to a stretch/shrink factor of 1.6)
- Push Increase/Decrease Width button
- Push Increase/Decrease Height button
Note: it is best to scale in one step vs multiple steps as control widths and font sizes are integers and may have rounding after each step.
Note: any bitmap images will be unchanged and remain the same size. They can be manually scaled with a graphics app if necessary.
Screen Editor with Screen Scale of 60% and all controls selected:

Example Original Screen:

Example Scaled up 60%

Hierarchical Sub Script Files
When creating multiple Screens with sections of Controls that are duplicated among screens, possibly re-positioned on the Screen, it is useful to make use of SubScript files. Selecting one or more Controls and setting a SubScript file name for them will move them to a separate file which will then be referenced from the main file. SubScript files can also reference SubScript files in a hierarchical manner.
See this Video Demonstration